
My workflow for transforming academic Markdown into beautiful Word documents
12/01/2019
I've bundled a significant part of this setup into a simple menu bar application, available here.
01/03/2018
Updated for compatibility with Pandoc version 2.1.1.
Over the last few months, as I've been working on my PhD, I've set up a workflow to convert my writing (in everyone's favourite simple markup language, Markdown), as if by magic, into Word documents which I can email to my supervisor, without having to explain to her that Markdown is great, really, if you only tried it you'd see. She is busy and does not have time for my shit. As a bonus, this workflow turns all your citations into automatic references according to whatever style you happen to be using (Chicago, MLA, APA, MHRA, anything), with all of the appropriate ibids. and page numbers and everything. Seriously.
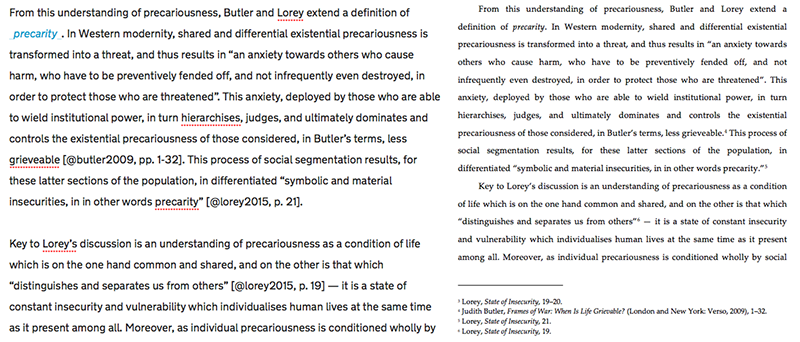
To that end, this guide - as much for my own future benefit as anyone else's - lists everything that is required to allow me to transform what is on the left into what is on the right with a click of a goddamn button. We do live in the future.
Writing
First, I write my work in Ulysses. Ulysses is a beautiful Markdown word processor and project manager which has the inner workings of a really powerful writing tool like Scrivener, but stays well out of the way when I write. Ulysses is great and I love it a lot. I've only made minor aesthetic changes to Ulysses' default preferences, as well as one very important non-aesthetic change which I will get to in the next section.
Referencing
When it comes to academic references, I use a reasonably complex system which is, however, extremely flexible, sits in the background, and doesn't disturb anyone. It's also so portable that when I reinstalled macOS recently, it took me fifteen minutes to set it up again. I have named this system Zotero/BetterBibTeX/zotpick-applescript/Service, because that is what it is made of and I'm sorry, I can't be called upon to be imaginative on demand. This is how to set up the same system for yourself:
- Use Zotero. If you don't use Zotero, you're bang out of luck, although I know a similar (and slightly more swish) system is already inbuilt for Papers (look, the Ulysses blog even have a tutorial for it - traitors), but I don't want anything to do with Papers because Zotero is beautifully, charmingly ugly, and that's the way I like it. I have tried all of the referencing managers, Zotero is the one for me, I will not apologise. If people want a guide to how to get a lot out use and goodness out of Zotero, please email me and I will comply.
- Install Zotero Better BibTeX. Follow the installation instructions here. This is a plugin for Zotero which sets up better (hence the name) citation keys for every item in your database. A citation key is a unique reference to an item - for instance, Judith Butler's 2009 book Frames of War will be given the key butler2009, and when I add Butler's 2009 article 'Performativity, Precarity, and Sexual Politics' to my Zotero database, it will automatically be named butler2009a, to distinguish it from the book. You can also change these citation keys manually to whatever you want!
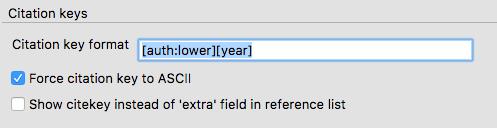
- Once you've installed Better BibTeX, go into Zotero. You need to change a few things. Open Preferences, click the Better BibTeX tab, and then under Citation keys change the citation key format to [auth:lower][year], like this:
Now the citation keys for all your papers are going to look something like this: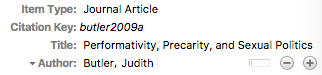
- Now go to the File menu in Zotero and click Export Library. You are about to create an auto-updating list of all the citation keys in your Zotero library! For Format, select 'Better BibLaTeX'. Don't tick any of the other boxes apart from 'Keep updated'. Select where to save this file - I keep mine in my Dropbox.
- Now go back to Preferences - Better BibTeX. Go to the Automatic Export tab. You'll see your Better BibLaTeX library. I changed the Automatic export option here to On change, which means it'll update my library as soon as I change or add anything to Zotero, but you can keep yours however you want. This finishes the Zotero section of the referencing system.
- Now download zotpick-applescript. This is a magical piece of code which will allow you to drop your newly minted citation keys into any text processor you happen to be using. You actually only need the file named 'zotpick-pandoc.applescript' - open it up and copy the contents.
- Now open Automator (in the Applications folder). Click New Document and select Service. At the top, select no input in any application. Then drag the 'Run AppleScript' module from the left sidebar into the main window. Replace everything in the text box with the contents of the 'zotpick-pandoc.applescript' you copied. Save your new service!
- Open System Preferences. Go to Keyboard, then Shortcuts, then Services in the left sidebar, scroll down to the bottom, click on your newly named service, click the 'Add Shortcut' button, and press your chosen shortcut for quickly activating Zotpick. I use ⌘-` (tilde key, on the top left corner of my keyboard).
- Now go to your text editor of choice. When you need to add a citation, first type two square brackets and place the cursor between them. Then press your chosen shortcut. The Zotpick window will appear - search for the item you need, select it, add prefixes, suffixes, and page numbers. When you press Enter, the full citation key will be copied into your text editor.


- This is where the non-aesthetic change to Ulysses comes in. Ulysses' standard Markdown parser will render
[]as the beginning of a link, as would any standard Markdown parser. This doesn't matter one bit for the export stage, but Ulysses will try to dress up your citations as links, which is bothersome. To avoid this, you need to change the link symbols in Ulysses to something else, like angle brackets - to do so, follow the Preparations for Ulysses section in this guide.
Exporting
Now for the fun bit. Before you proceed, make sure you have the following things set up:
- A Zotero BibTeX library which stores all your citation keys.
- A Markdown-formatted document which incorporates your citation keys in square brackets in the places where your references are going to go (whether you are using inline references or footnotes - I use footnotes, my partner loathes them, but then there's no accounting for classicists - place your citation keys before your full stops. The export engine will sort it all out for you.
Now you are going to install Pandoc. Pandoc is an obscenely powerful text converter which can transform almost any popular file format into almost any other popular file format. The downside - if you don't use the Terminal much - is that it's a command line utility, but we're going to turn that command line utility into a simple app.
To begin, download the file named 'pandoc-2.1.1-macOS.pkg' from this page. Install the package. (Alternatively, if you are comfortable using Homebrew, install Pandoc through Homebrew:
brew install pandoc. This will make future updating easier.)Test that Pandoc has installed correctly. Open Terminal and type the following:
pandoc -v. If you get some information about Pandoc's version, it's working. Close the Terminal.Now you need to set up two things for Pandoc to be able to create a beautifully formatted and referenced Word document. The first of these is your CSL file of choice. There are CSL, or Citation Style Language files for almost any referencing system under the sun, which contain all the necessary rules to automate referencing. Go to the CSL repository and find your favourite style (I use Chicago note and bibliography with no ibid. - yes, you can be that specific with some of the more popular styles). Download this file and save it somewhere you'll want to keep it (I created a 'Scripting' folder in my PhD folder in my Dropbox).
The second thing you need to do is create a reference Word document file - a template with preset styles so Pandoc knows what sort of file to output. This is a finicky process, described in the Pandoc manual (search for 'reference-doc'). Alternatively, download the one I made - it's Quite Nice. You can consult the manual to see which styles you can tweak yourselves. Save it somewhere sensible too.
Now open up your trusty Automator again. This time you want to create an Application.
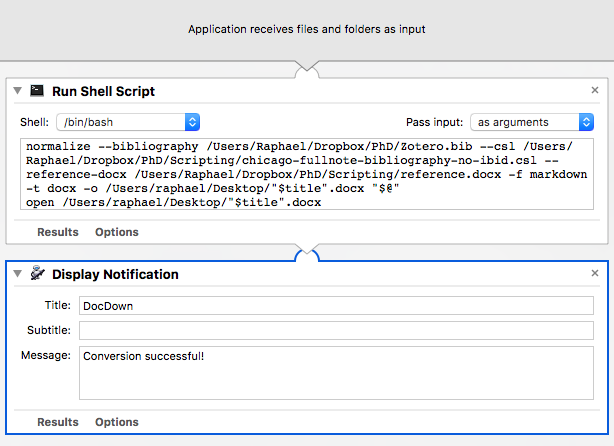
Drag the module called 'Run Shell Script' (in the Utilities section) into the main window. Make sure that your shell is '/bin/bash' and you are passing input as arguments. Now copy the following piece of code into the text box:
title=$(basename "$@" .md)
echo -e "\n\n# Bibliography" >> "$@"
/usr/local/bin/pandoc -s --filter=/usr/local/bin/pandoc-citeproc --bibliography /PATH/TO/BIBTEX/LIBRARY/Zotero.bib --csl /PATH/TO/CSL/FILE/FILENAME.csl --reference-doc /PATH/TO/REFERENCE/DOC/reference.docx -f markdown+smart -t docx -o /PATH/WHERE/YOU/WANT/TO/EXPORT/"$title".docx "$@"
open /PATH/WHERE/YOU/WANT/TO/EXPORT/"$title".docx
The first line sets the filename of your new file to be identical to the filename of whatever file you sent into it. The second line puts the heading 'Bibliography' at the end of the document - that way the bibliography Pandoc will automatically create will have a heading. You can delete this line if you don't need it. The third line is the Pandoc command. You need to edit all the paths in ALL CAPS in this code. Make sure you've got the right location for your exported BibTeX Zotero library, your CSL file, your reference.docx, and the place you want your converted file to end up. If you're not sure what the path of a folder is, use this one weird trick: in Finder, grab the blue folder icon at the very top of the window, next to the name of the window, and drag and drop it into the text box. Cool, right? If your path has spaces in it, put it in double quotes, like this:
"/Users/bobross/Happy Squirrels/reference.docx".I then also dragged the 'Display Notification' module into the main Automator window below the script module, so that I'd know when the conversion was done. In practice, it happens pretty much instantaneously, but it's cute. Here's what mine looks like:
Save your Automator application in your Applications folder, because that's where it deserves to go - I've named mine DocDown.
Now for the cool bit. You can simply drag any text file with the extension
.mdonto the DocDown application and it will do its magic conversion business. But in Ulysses, you can make the magic happen without even leaving the editor. Click on the Share button in the top right, select Text, Markdown, then click the A button and select Other. Find DocDown.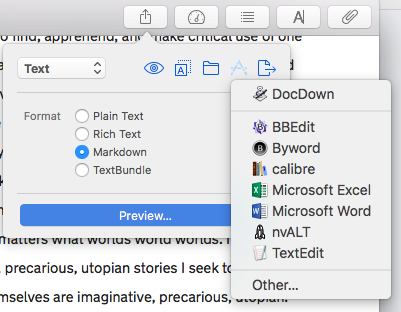 Your current Ulysses document will be converted instantly into a Word document in your chosen location, with references flown in from your Zotero library and edited by your CSL file. Well done. You are academia god. We all bow down.