
WS2812 fairy lights with ESPHome and the Pimoroni Plasma Stick
Last month I picked up the Pimoroni Plasma Stick, which is essentially an RP2040-powered Raspberry Pi Pico bolted onto a terminal block and a Qwiic/STEMMA QT connector, to make it easier to connect WS2812/NeoPixel-style individually addressable RGB(W) LED light strips. That's a lot of terminology!
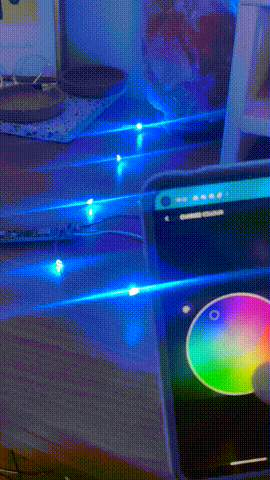
Once the Plasma Stick arrived in the mail, I connected it to a string of WS2812 LEDs, also from Pimoroni. I like this flexible LED wire because it hangs attractively along a wall like fairy lights, although it is quite fragile - I've had one of these short-circuit and die on me.
My goal was to use the Plasma Stick to create a set of fairy lights I could control through Home Assistant, by creating an ESPHome device.
What are Home Assistant and ESPHome? Here's how ESPHome describes itself:
ESPHome is a tool which aims to make managing your ESP boards as simple as possible. It reads in a YAML configuration file and creates custom firmware which it installs on your ESP device. Devices or sensors added in ESPHome’s configuration will automatically show up in Home Assistant’s UI.
In my mind, ESPHome is a toolkit which allows me to transform regular development boards into 'smart home' devices, without locking myself into the ecosystem of any particular smart home vendor.
Home Assistant is a web interface and mobile app which allows me to create dashboards to control my smart devices, with first-class support for ESPHome. It's much more powerful than that - it also allows me to create complex integrations and automations to make our home feel even smarter. But at the most basic level, it's a way to display a web page where I can control my fairy lights.
As the name suggests, ESPHome is originally designed to be used with ESP boards such as the ESP8266 and ESP32. The Plasma Stick, however, is an RP2040 device with a completely different architecture. But it seemed to be the very easiest way to connect RGB lights to a networked development board - so I started working out how to make ESPHome play nicely with it.
Getting started with ESPHome
This was my first foray into ESPHome, so I started by installing the toolkit (which is just a Python package). However, to make it work with our board, we need to do some Weird Hacks. So that the hacks don't interfere with the rest of my machine, I'm going to perform the whole process in a separate directory structure and use a Python virtual environment:
mkdir -p ~/esphome/{venv,devices}
This creates a directory, esphome/, and two subdirectories, esphome/venv and esphome/devices.
Then I create a Python virtual environment, and activate it:
python3 -m venv ~/esphome/venv
source ~/esphome/venv/bin/activate
Now that my virtual environment is activated, which I can confirm by checking that the left of my bash prompt reads '(venv)', I can install esphome:
pip3 install wheel
pip3 install esphome
pip will install its files only inside my local venv folder. This is very good, because in a minute we're going to directly hack those newly installed files.
Creating the ESPHome device
The lovely thing about ESPHome is that its devices are simply YAML files of simple definitions, and the ESPHome toolkit handles the complex stuff for us. In the devices subfolder, create a file called fairy-lights.yaml with the following contents:
esphome:
  name: fairy-lights

rp2040:
  board: rpipicow
  framework:
    platform_version: https://github.com/maxgerhardt/platform-raspberrypi.git

wifi:
  ssid: !secret wifi_ssid
  password: !secret wifi_password
  fast_connect: true

logger:
  level: DEBUG

api:

ota:

light:
  - platform: fastled_clockless
    rgb_order: GRB
    chipset: WS2812
    num_leds: 50
    name: "Fairy Lights"
    pin: GPIO15
    effects:
      - addressable_rainbow:
          name: Rainbow
          speed: 5
Then ceate a file called secrets.yaml:
wifi_ssid: Your WiFi SSID
wifi_password: yourwifipassword
The rp2040 directive object tells ESPHome that we're targeting an RP2040 board, specifically an rpipicow (i.e. Raspberry Pi Pico W) one. According to the ESPHome docs, the platform_version directive is necessary for the time being to prevent compilation errors. The wifi directive pulls in its secrets from the secrets.yml file during compilation - you can just hardcode those values directly if you like. The logger directive provides helpful logging; the api directive allows us to access this device from Home Assistant, and ota allows us to update it over WiFi once ESPHome is already installed.
The longest directive is light, of course, and all the documentation for it is here. We're using the fastled_clockless platform for reasons which will soon become apparent, and because it allows us to implement lovely lighting effects. You may need to change the chipset, rgb_order, and num_leds directives to suit your own lights. There's also a rainbow effect, of course, because rainbows are awesome.
In a perfect world, we would now connect our Plasma Stick to our laptop and run this command:
esphome run fairy-lights.yaml
Sadly, that gives us the following output:
This feature is incompatible with RP2040. Please see note on documentation for FastLED.
That's odd - while the NeoPixelBus platform doesn't have support for RP2040, it looks like the FastLED platform does! Why isn't it working in ESPHome?
It turns out that the version of the FastLED library that ESPHome uses is 3.3.2, while we need to use a version with RP2040 compatibility, introduced in this PR. It's been merged into main, but there hasn't been an official release since then, so it's time for Weird Hacks.
Weird Hacks
Open the file ~/esphome/venv/lib/python3.11/site-packages/esphome/components/fastled_base/__init__.py. If your Python version isn't 3.11, your site-packages/ directory will be in a different directory. This file defines ESPHome's relationship with the FastLED library. Delete the following line, replacing it with the line below:
  await light.register_light(var, config)
- cg.add_library("fastled/FastLED", "3.3.2")
+ cg.add_library("", "dev", "https://github.com/FastLED/FastLED#58f9c15")
  return var
We're telling ESPHome, instead of downloading version 3.3.2 from the fastled/FastLED GitHub repo, to instead download the version of the code at commit hash 58f9c15, and to call it 'dev'.
Now we need to tell ESPHome that this version of FastLED is in fact compatible with the RP2040 architecture. In the file ~/esphome/venv/lib/python3.11/site-packages/esphome/components/fastled_clockless/light.py, add the following line:
  esp32_arduino=cv.Version(99, 0, 0),
+ rp2040_arduino=cv.Version(99, 0, 0),
  max_version=True,
After these two changes have been made, you can try running esphome run fairy-lights.yaml once more, with the Plasma Stick plugged into your computer of course, and this time, the toolkit should successfully compile the code for the RP2040. Give it a few minutes, and you should be able to see it appear on your WiFi network, after which you can add it into Home Assistant through the ESPHome integration.
Caveats
It should go without saying that directly hacking ESPHome's interface with a library may not work! In this case, I adopted the necessary changes from an ESPHome PR, which was closed and abandoned by the author with the message:
I deployed this branch on a pico-w and it resulted in undesired behavior. The pico-w was seemingly crashing at random and in general very unstable.
In my experience running this Plasma Stick for a month, I've seen no crashes, except for some strange behaviour after my WiFi booted the decive off the network. Nonetheless, for a better experience, it's definitely worth keeping an eye on ESPHome's releases to find out when (if ever!) FastLED compatibility goes into production, and replace the Weird Hacks edition of esphome in this venv with the new version at that point.
Happy fairy light hacking!